Windows 11 has taken the user experience to a new level with sleek design changes and enhanced functionalities. One of the standout features for multitasking and organization is the improved virtual desktops. These allow users to create separate spaces for different tasks or projects, helping to keep workflows organized and focused. In this comprehensive guide, we’ll explore the ins and outs of how to switch between desktops in Windows 11, enhancing your productivity and making the most out of your computer’s capabilities.
1. Understanding Virtual Desktops in Windows 11
The Concept of Multiple Desktops
Before we dive into the mechanics of switching between desktops, it’s important to understand what virtual desktops are. Similar to having multiple physical monitors, virtual desktops provide additional screens where you can open different sets of windows and applications. This feature is especially handy for those who work on various tasks simultaneously but have limited screen space.
Benefits of Using Multiple Desktops
Using multiple desktops can significantly improve your productivity. By dedicating different desktops to specific tasks, like work, personal activities, or gaming, you can reduce clutter and make it easier to find what you need. It also helps minimize distractions, as you can isolate work-related applications from leisure ones.
2. How to Create New Virtual Desktops in Windows 11
One of the most beneficial features introduced in recent iterations of Windows, including Windows 11, is the ability to create multiple virtual desktops. This allows users to organize their applications and workflows in a much cleaner and more efficient manner. Let’s walk through the steps of creating new virtual desktops in Windows 11 and discuss some best practices to make the most of this feature.
Step-by-Step Guide to Creating Virtual Desktops
Using Task View:
- Access Task View: Press the
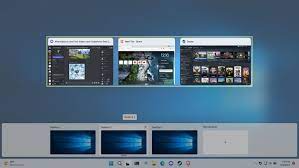
Win+Tabkeys on your keyboard to access Task View. Alternatively, you can click on the Task View icon on the taskbar (next to the Start button and search icon). - Create a New Desktop: In the Task View pane, look at the top of the screen where you will see your current desktop(s) displayed as small panels. There will be a ‘+’ sign with ‘New desktop’ written next to it — click on this to create a new virtual desktop.
Shortcut Key Method:
- Quick Creation: For those who prefer keyboard shortcuts for speed and convenience, press
Win+Ctrl+D. This will immediately create a new virtual desktop and switch you to it.
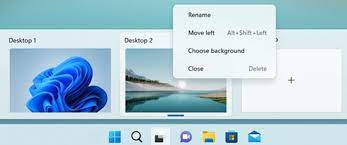
Naming and Personalizing Virtual Desktops
Once you’ve created a new virtual desktop, it’s a good practice to give it a specific name related to its intended use. For instance, one might be labeled ‘Work’, another ‘Personal’, and a third ‘Gaming’. To rename a desktop:
- Open Task View: Enter Task View using
Win+Tab. - Choose the Desktop to Rename: Hover over the virtual desktop you wish to rename until you see the name and an edit icon or a pencil icon appear.
- Rename: Click on the name or the edit icon and type in your preferred name for that desktop.
Organizing Windows Across Virtual Desktops
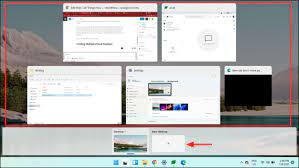
Properly organizing your open windows and applications on the different desktops can significantly streamline your workflow. Within Task View, you can click and drag open windows from your current desktop to any other desktop. You can also right-click on an open window to access a context menu that will allow you to move the window to another desktop or even open it on all desktops.
Best Practices for Using Virtual Desktops
- Dedicate Desktops to Specific Tasks: Assign each virtual desktop a particular category of tasks to avoid confusion and maintain focus.
- Limit the Number of Desktops: While you can create numerous desktops, having too many can become counterproductive. Keep the number manageable based on your multitasking needs.
- Close Unnecessary Desktops: To keep the Task View interface clean and ensure optimal system performance, close virtual desktops that are no longer in use.
- Consistent Layout: Maintain a consistent layout of windows within each desktop as much as possible. This will help muscle memory and allow you to work more efficiently.
Considerations When Using Virtual Desktops
- Remembering Shortcuts: Learning and remembering the keyboard shortcuts for creating and switching between virtual desktops can save you time.
- Desktop Persistence: By default, virtual desktops do not persist after a system reboot. However, this behavior might change with future updates or can be altered using third-party utilities.
- Resource Management: Each desktop you create does not get its own set of resources. All desktops share the same pool of CPU and RAM, so keep an eye on the performance of your system if you have many applications open across several desktops.
Creating and managing virtual desktops in Windows 11 is a straightforward process that, once mastered, can lead to a more productive computing experience. By learning to effectively use virtual desktops, you’re able to declutter your digital workspace and compartmentalize different areas of your digital life, whether they pertain to work, study, or play.
3. Switching Between Desktops with Keyboard Shortcuts
The quickest way to switch between desktops is by using keyboard shortcuts. These are the combinations you can use:
Standard Shortcuts
Win+Ctrl+Left/Right Arrow: This allows you to cycle through your virtual desktops quickly.Win+Tab: Opens Task View to see all desktops and recent applications.
Custom Shortcuts
Windows 11 does not natively support custom keyboard shortcuts for switching desktops, but you can use third-party tools to set up custom hotkeys if you prefer a different shortcut scheme.
4. Using Task View and Mouse Gestures
Accessing Task View
Clicking on the Task View button on the taskbar or using the Win + Tab shortcut will bring up the Task View. From there, you can click on the desktop you wish to switch to.
Mouse Gestures and Touchpads
If you have a touchpad, you can use a four-finger swipe left or right to switch between desktops. For mouse users, certain mice come equipped with buttons that can be programmed to mimic the Win + Ctrl + Left/Right Arrow keyboard shortcut.
5. Organizing Desktops for Efficiency
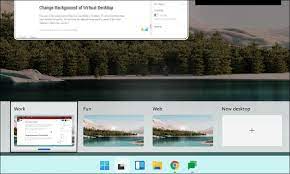
Naming Your Desktops
To keep track of your virtual desktops, it’s a good idea to name them according to their purpose. Simply click on the desktop in Task View and choose the option to rename it.
Reordering Desktops
If you want to change the order of your desktops, you can click and drag them to rearrange them in Task View. This can help you create a logical sequence for your workflow.
6. Advanced Tips for Power Users
Group Policy and Registry Tweaks
Advanced users can delve into Group Policy or the Windows Registry to make changes to how virtual desktops function. However, these methods should be used with caution, as they can affect system stability if not done correctly.
Automating Desktop Management
You can use scripts or third-party applications to automate virtual desktop creation, switching, and organization. For example, AutoHotkey is a powerful tool that can help power users create custom scripts for managing desktops.
7. Troubleshooting Common Issues
Desktops Disappearing After Restart
One common issue is that virtual desktops may not persist after a system restart. To resolve this, make sure you have the latest Windows updates installed, as Microsoft frequently releases fixes and improvements.
Performance Considerations
Using a large number of virtual desktops with many open applications can impact system performance. Ensure your PC has enough RAM and CPU power to handle your multitasking needs.
Conclusion
Windows 11’s virtual desktop feature is a powerful tool for multitasking, organization, and maintaining a clutter-free workspace. By understanding how to switch between desktops quickly and efficiently, you can enhance your daily productivity. Whether you’re a casual user who likes to keep work separate from play or a power user who juggles multiple projects simultaneously, mastering virtual desktops is a skill that will serve you well in the modern computing environment. Remember to name your desktops, use shortcuts wisely, and don’t shy away from experimenting with advanced features to tailor your experience. Happy multitasking!